How To Make a DIY Hat Rack
Hats are a stylish accessory that can add flair or function to any outfit. However, if not stored properly, they can quickly become misshapen or mixed up with things like shoes and handbags. Instead of tossing your favorite caps on a chair or stacking them on your dresser, why not build a DIY hat rack? With some affordable materials and a little elbow grease, you can create a unique and practical solution to keep your hats organized and accessible.
In this guide, the experts at KO Storage will explain the entire process of how to make a DIY hat rack, from choosing materials to assembling different styles. Whether you’re interested in a classic wooden design, a minimalist rod hanger, or a decorative wall-mounted display, you’ll find the perfect solution here.
Different Types of Hat Racks
Before you roll up your sleeves and dive into building, take the time to identify the type of hat rack that best suits your needs. The two main types of cap racks are:
- Standing hat racks. These freestanding units resemble coat racks and are great for entryways or bedrooms. They typically have multiple hooks or arms for easy access.
- Hanging hat racks. Mounted on the wall, these racks are an efficient use of space and can be placed anywhere as a striking display of your personal style.
Materials for DIY Hat Racks
Gathering the right materials is a key part of a cap rack DIY project that is stylish and sturdy. Below, we’ve listed the essentials you’ll need to create your custom hat storage solution.
Wood
Wood is a classic choice, whether you opt for pine, oak, or another material. You can cut custom pieces yourself if you have the skills and tools, otherwise purchasing pre-cut two-by-fours or wooden planks from a hardware store is your best bet.
Rods
Dowel rods, curtain rods, or even repurposed metal rods can serve as the backbone of your cap rack DIY project. Recycling old rods or repurposing materials from around your home can add a sustainable element to your build.
Hooks
The type of hooks you use depends on your design. Shower hooks, curtain rod hooks, and metal screw-in hooks are all easy and affordable options. If you prefer an industrial look, consider using pipe fittings or decorative brackets.
Tools
To assemble your DIY hat rack, you’ll also need some basic tools such as:
- Drill
- Screws
- Wood glue
- Sandpaper for smoothing rough edges
- A finish, stain, or paint to enhance the final look
How To Make a Hat Rack
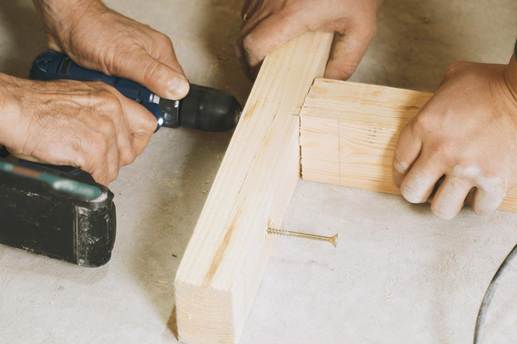
After you’ve gathered your materials, it’s time to build. Start by measuring your wood or rods to the desired length. Sand down any rough edges, then decide on the placement of hooks or supports. Safely drill holes or attach hooks accordingly before securing the rack to the wall or creating a freestanding base. Keep reading for some specific ideas for different styles.
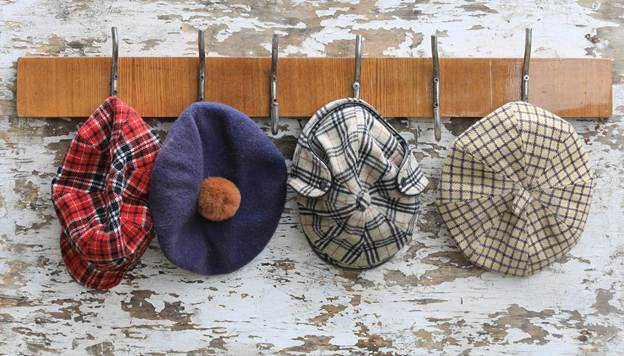
Unique Wooden Hat Rack Ideas for DIY
A wooden hat rack is both functional and decorative. Here’s some advice for building a wooden cap rack:
- Cut and sand your wooden board to size.
- Drill evenly spaced holes for your hooks.
- Screw in the hooks securely.
- Attach mounting brackets to the back for wall installation.
- Finish with paint or stain to match your decor.
DIY Hat Hanger
You can easily utilize the power of gravity to hang your hats in your home. Here’s a few tips for making a DIY hat hanger:
- Mount a dowel rod or use a tension rod horizontally on a wall.
- Use S-hooks, shower hooks, or clothespins to hang hats.
- Ensure the rod is secure to prevent sagging under weight.
Hat Rack for Wall Ideas
If you want to make a stylish display for your hats, consider taking advantage of some wall space. Keep this information in mind as you go:
- Arrange small wooden pegs or hooks in a creative pattern on a wooden board.
- Secure the board to the wall with sturdy mounting hardware.
- Display hats at an angle for easy grabbing and a visually appealing look.
Cap Rack DIY Tips
If you want a stylish and functional DIY hat rack, choose a location that offers easy access while complementing your space, such as an entryway, bedroom, or closet. If you’re mounting the rack on the wall, make sure it’s anchored securely to support the weight of multiple hats. Finish any construction project by adding a protective coating for durability and style.
Store Tools and DIY Materials at KO Storage
As any crafty or handy person knows, taking on DIY projects requires a lot of space—not just while you’re working, but also when it comes to storing your equipment. Instead of cramming your tools and materials into your garage or crawlspace, rent a personal storage unit from KO Storage. We offer options in several convenient sizes that range from small 5×5 lockers to large 10×30 units. Whatever your project’s scale may be, we have the space to help make it easier.
Get the gears turning today and explore our blog and FAQ page to educate yourself further about the rental process. Once you’re ready, find a KO Storage facility near you to get started!